It has come to my attention that some of my older posts from when I was first starting this blog are not entirely completed. I must have honestly forgotten to finish articulating the ideas I was considering due to being busy with school at the time. I apologize to all who have viewed them! Anyway, over time I will be steadily fixing and completing these incomplete posts!
Hello all! As I have said before in the past: One’s weapon should be of their own preference and function. Your sword should be your own! In the heart of that principle, a friend and I came up with our own desired sword designs and I drew them! There will be a bit of technical jargon, but hopefully you all can still appreciate the designs!
This sword design is mine! I wish it to actually be similar to a swiss saber bastard sword– Leather-wrapped wooden upper grip, the rest of the handle is solid steel-extended pommel style. Blade length of about 30 or 32 inches and I suppose the base of blade would be between 2 and 3 inches wide with distal taper down to 1.5 inches or so before the point.I want a fuller stretching from the guard to to last third or quarter of the blade, where the back edge will be sharpened the rest of the way down. I also want the entire hilt assembly to be about 10 or 11 inches in length, leaving the grip length at about 7 or 8 inches–enough for one hand to cover the leather-covered grip and the rest of the steel extended pommel for my second hand. POB of around 3 inches. I want a slight curve to the blade.
This is my friend’s sword! His sword will have very similar specs to mine except that his is a tactical hand-and-a-half saber. Solid steel with cord-wrapped handle–integral guard on edge-side only and completely single-edged.
My friend and I both appreciate the beauty of a single-edged, curved sword like those of elven fantasy design but have noticed that there is little functional quality to them since many of them do not have handguards, so we designed our own!
It’s been some time since I have posted and I do apologize for that! Today I am discussing Historical European Martial Arts (HEMA). I have been interested in martial arts of all kinds for some time now, but as I have previously discussed, the katana and its arts have somewhat lost their weight in my mind as I have become more interested in the longsword and hand-and-a-half sabers. I am going to begin the endeavor to learn Longsword techniques soon! The best part? I’m not doing it alone! One of my best friends will be joining me! I recently discovered several videos, especially ones by a YouTube user by the name of Skallagrim, where I learned of the Rawlings synthetic sparring swords! They come in single handed sword, longsword, and messer shaped blades with different handguard and pommel options. There is even an extended pommel which can make the arming sword into a “bastard sword,” the longsword into a greatsword, and the messer into a hand-and-a-half configuration. There is even a basket-hilt option, and the best part? All of these pieces are interchangeable, except for the longsword handle has to go on the longsword.
My friend and I both found ourselves admiring the messer with extended pommel and so these are the ones we are getting to train with.
My friend is so generous, in fact, that he has told me he will purchase both training swords to ensure that we will be able to train together!
This is only the beginning, however, as we will still need safety gear. This includes head protection, throat protection, padded gloves, and other padding. For now, caution will be our protection, but there will still be plenty of room for mistakes and injury. We are up for the challenge though!
Many practitioners use fencing masks modified to have side and back-of-head protection, but these are expensive for us right now. We had considered buying full-visored motorcycle helmets for $30 each, but then there is the possibility that the visor could crack. I have chosen to take the option for buying sheet steel of about 14 or 16 ga. and make a full steel helmet of my own with a perforated visor for visibility. I was thinking of a design similar to this:
OR
The only difference is that instead of having eye slits, I would leave the plate solid then perforate sections of it for visibility without sacrificing protection for my eyes. I have read that the steel can really damage the synthetic blades, but I think that maybe I can remedy this by covering any edges and rivets with either rawhide or leather.
Other paddings are not very expensive. I can either buy some pads at a local thrift store or find good bargains online. I will probably want a mouth guard, a throat guard, elbow and knee pads, and a cup. If I decide to have any other padding or armors, I can always make other steel pieces. These will be easy to make after I have made my helmet!
I plan on keeping everyone updated on the progress, so stay tuned! Take care everyone!
Please forgive me, viewers, I have been quite busy and have very little to show for it!
First off, I promised more updates on forge progress. I must say that I have nothing. I built a very simple, working hole in the ground setup but I never got to use it because it rained every single day. I was going to hand forge swords to give to my groomsmen for my wedding, which was on September 21st, but I never got to do so, so I bought some tactical wakizashi and customized them myself by shaving down the rubber handles, wrapping them with leather and wire, then adding some simple embellishments to the sheath. I do not currently have any available photos of these but I hope to get some soon to share!
I also have some ideas for a few training weapons and armor pieces floating around in my head involving bars of mild steel flat stock. Please stick with me and continue ti bug me about updates if interested!
Thank you so much!
-Victor
P.S. The wedding was beautiful and I did manage to complete the ten chainmail flowers I promised I would make as centerpieces! I am open to making some on commission if you wish to contact me about any ideas, including training weapons or shields!
Hello everyone! I hope that this post finds you all well!
I must apologize for delays in my posts. In my last post, I promised at least forge pictures within the week. I am sorry, this has not been able to happen. I have not been able to drill holes in my airflow pipe, I haven’t been able to dig my holes for the forge or the charcoal pit, nor have I been able to procure the pieces of steel from home to use as an anvil. I also need my hammer and gloves brought to me and to purchase a pair of tongs. Here is the bright side: I will be able to purchase a pair of tongs by next week! I may get to do more preparations as well! Still need to dig out my camera, but until then, here is a picture of the type of tongs I will be buying:
These are known as wolfjaw tongs and I am choosing to buy these because they are universal holders! They can hold round stock, square stock, and flat stock! I will be paying about 40 or 50 dollars, which is a lot for me, but it is worth it, as these should last me for years! I will also eventually make my own custom tongs, but I feel these will be the best for me to start with.
Once again, I am sorry for the delays! Be well everyone!
Hello everyone, today we will be discussing modern steels that are good for use in forging swords! First off are high carbon steels between the 1060 and 1095 range! The 10 in those numbers denotes that the steel is not alloyed, but is pure carbon steel. The numbers 60-95 denote the amount of carbon in the steel. 1060 Carbon Steel means that this steel is a non-alloyed steel of about 0.60% carbon in composition. 1095 then means that the carbon amount is about 0.95% carbon. Any 10 steel between 1060 and 1095 is good for a sword, but between 1060 anf 1075 is best because much more than 0.75% carbon is almost too much carbon, which causes the blade to be too hard and brittle unless tempered correctly. These 60-95 parts are known as points.
Along with what was previously stated, all numbered and lettered steels have those numbers and letters to denote what the composition of the steel is. I do not yet have these classifications memorized, but there is a good section on this in Jim Hrisoulas’ book The Complete Bladesmith in his chapter on steels to use. I highly recommend this book, by the way! It is a very informative and engrossing read! Either way, the first two numbers of a four number steel classification denote which metals are alloyed into the steel. In all of these steels, the last two numbers denote the carbon content. I do not know enough yet to say what the lettered steels such as O1, A2, and D2 are.
Always research the steels you plan on using. A steel with a four number code with a carbon content of 60 to 95 points is enough carbon for a good blade, but you must research the alloying numbers in order to find out whether the alloys lend themselves well to blades or not.
Some good steels I have researched and found can be used for swords are as follows:
5160
6150
1060-1095
A2
D2
O1
T10
There are many more steels which can be used, but these are just a list of a few. Also, I have read that O1 and D2 are great for knives but may not be great for swords due to brittleness.
On Ebay, these steels can be found at amazing prices for the piece you get! I would suggest finding old leaf springs in a junk or scrap yard as they are cheap and are generally good 5160 steel which is great for swords! I will try to start with some of those if I get time to go out and find them, but if I do not get the time to go out, I may just pay the price to have the steels delivered to me. I have also considered buying a piece of this steel, cutting it into pieces, stacking it together after hardening and tempering the top plate, then binding it all together with mild strap steel for an anvil. I could even make one plate longer before stacking and forge the overhang into an anvil horn!
This picture is just an example of how I may stack the steel before strapping.
For an update: I will be beginning to build my forge today and with take lots of pictures if I’m able! I will share those in one of my next posts! Also, burmabykravmaga at http://urbantacticskravmaga.wordpress.com/ gave me a wonderful idea to watch the documentary Secrets of the Viking Sword and do an assessment of its claims and possible theories based on some research I will conduct! Both of those posts are on the radar for the relatively near future and I will keep everyone updated!
Traditional Japanese armor is known as Yoroi. There were yoroi suits worn by both samurai and by foot soldiers in service of the samurai, but the most iconic Japanese armors were only worn by samurai.
Many types of armor have been used throughout the millenia. Maille of many types worldwide, leather armor, lamellar of metal or of leather, brigandine, plate, etc. Each was labor intensive and quite expensive, though for richer customers, armorers could make quite beautiful decorative armor.
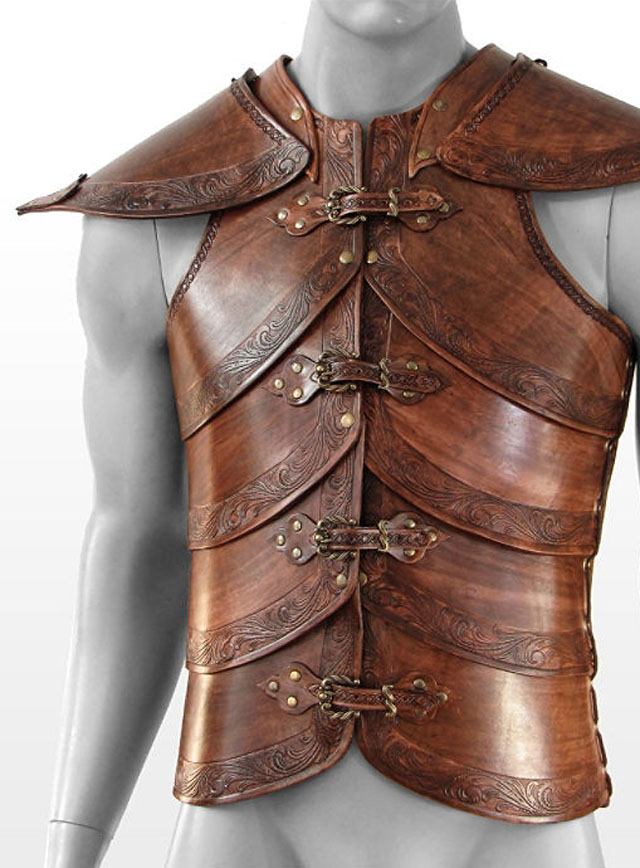
Today I will be discussing modern leather armor. As we know, leather armor is not currently used in the modern world, but many reenactors have begun to create leather armor suits to substitute plate steel suits for reasons of weight, cost, and artistry.
Here are some examples of beautiful leather armor suits and pieces:
I fully intend to make my own leather armor similar to these pieces someday!
In the past I wrote a blog stating in detail about how often, European swords were higher quality than katana, but that in this modern age, most swords which are well made are equals due to a lack of armor. Despite that post, I still love the katana. It is a nice sword to handle and it is also quite aesthetically pleasing.
As the title suggests, this post is about what NOT to buy when looking for a katana. It is important to be careful because the katana has reached a level of popularity beyond any other sword, including fantasy blades. This has led to millions of cheap wallhanger decorations that people buy thinking, “Wow! A cheap, real sword!” I felt much the same way when I was very young. At the age of thirteen, I learned from experience the difference between a real sword and a sword-like object (SLO). I bought a cheap set of “swords” at a flea market at that age and, even though I knew they were decorative, I still liked to play around with them. Pretty early on, the wakizashi and the katana came very loose. I learned that they had welded on rod tangs which were held into the handles by a nut and bolt. That is obviously not what you want.
Alright, so this post is a bit off topc as it is not arms, armor, or smithing, but it is still related! I have been trying to make medieval and renaissance-styled tunics for some time now, but honestly they are quite difficult with no patterns! I have been drawing styles I could create by upcycling old t-shirts and will be making one soon! I have, however, created a tunic as of last night by upcycling two old button-down dress shirts. The tunic with a red sash belt actually looks quite nice!
Forgive me for the low quality picture, but I only had my phone for taking pictures at the moment. I enjoyed creating this tunic and it actually fits quite comfortably! I am considering the additions of colored sleeve extension panels, maybe red or brown in order to give my arms freedom of motion. I am also considering adding colored panels which hang down the front for added decoration.
I hope this has helped to give a few ideas for projects!